このチュートリアルでは、Ubuntu22.04LTSにLEMPスタックを使用してMoodleをインストールする方法を示します。 知らなかった人のために、MoodleはPHPで書かれた無料のオープンソースの学習管理システムとCMSです。 Moodleを使用すると、教育およびトレーニングコース用のフル機能のWebサイトを作成できます。これは、完全にオンライン、ハイブリッド、および対面での教室での体験に適しています。 Moodleプラットフォームは高度にカスタマイズ可能であり、機能に対してモジュール式のアプローチを採用しているため、拡張可能であり、ニーズに適応できます。 Moodleは、特に世界中の長距離教育機関が学習者にトレーニング資料を提供する際に役立ちます。
この記事は、少なくともLinuxの基本的な知識があり、シェルの使用方法を知っていること、そして最も重要なこととして、自分のVPSでサイトをホストしていることを前提としています。 インストールは非常に簡単で、rootアカウントで実行していることを前提としています。そうでない場合は、’を追加する必要があります。sudo‘root権限を取得するコマンドに。 Ubuntu 22.04(Jammy Jellyfish)にLEMPStackを使用してMoodleを段階的にインストールする方法を紹介します。 Ubuntu 22.04や、Linux Mint、Elementary OS、Pop!_OSなどの他のDebianベースのディストリビューションでも同じ手順に従うことができます。
前提条件
- 次のオペレーティングシステムのいずれかを実行しているサーバー:Ubuntu 22.04、20.04、およびLinuxMintなどの他のDebianベースのディストリビューション。
- 潜在的な問題を防ぐために、OSの新規インストールを使用することをお勧めします。
- サーバーへのSSHアクセス(またはデスクトップを使用している場合はターミナルを開く)。
- A
non-root sudo userまたはへのアクセスroot user。 として行動することをお勧めしますnon-root sudo userただし、ルートとして機能するときに注意しないと、システムに害を及ぼす可能性があるためです。
Ubuntu 22.04 LTSJammyJellyfishにLEMPスタックを使用してMoodleをインストールする
手順1.まず、次のコマンドを実行して、すべてのシステムパッケージが最新であることを確認します。 apt ターミナルのコマンド。
sudo apt update
sudo apt upgrade
sudo apt install software-properties-common dirmngr
手順2.LEMPスタックをインストールします。
このチュートリアルを開始する前に、LEMPサーバーをサーバーにインストールする必要があります。 LEMP Stackがインストールされていない場合は、こちらのガイドに従ってください。
ステップ3.Ubuntu22.04にMoodleをインストールします。
デフォルトでは、MoodleはUbuntu22.04ベースリポジトリでは利用できません。 次に、以下のコマンドを実行して、Moodleの最新の安定バージョンをUbuntuシステムにダウンロードします。
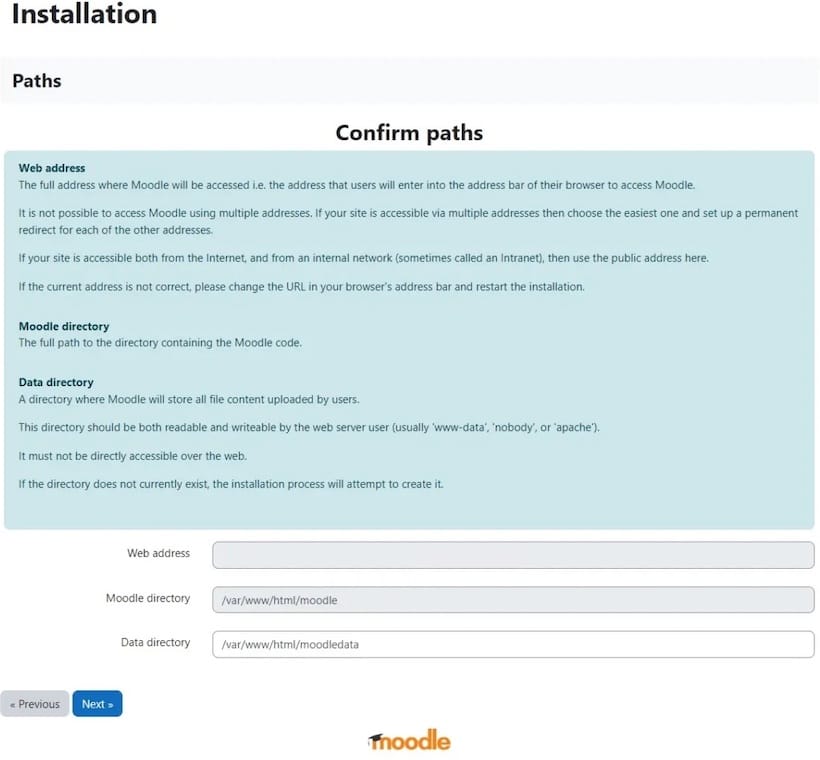
cd /var/www/html
git clone -b MOODLE_400_STABLE git://git.moodle.org/moodle.git moodle
いくつかのフォルダのアクセス許可を変更する必要があります。
mkdir -p /var/www/html/moodledata
chown -R www-data:www-data /var/www/html/moodle
chmod -R 755 /var/www/html/*
chown www-data:www-data /var/www/html/moodledata
ステップ4.Moodle用のMariaDBの設定。
デフォルトでは、MariaDBは強化されていません。 を使用してMariaDBを保護できます mysql_secure_installation 脚本。 ルートパスワードを設定し、匿名ユーザーを削除し、リモートルートログインを禁止し、テストデータベースと安全なMariaDBへのアクセスを削除する各手順を注意深く読み、以下を実行する必要があります。
mysql_secure_installation
次のように構成します。
- Set root password? [Y/n] y
- Remove anonymous users? [Y/n] y
- Disallow root login remotely? [Y/n] y
- Remove test database and access to it? [Y/n] y
- Reload privilege tables now? [Y/n] y
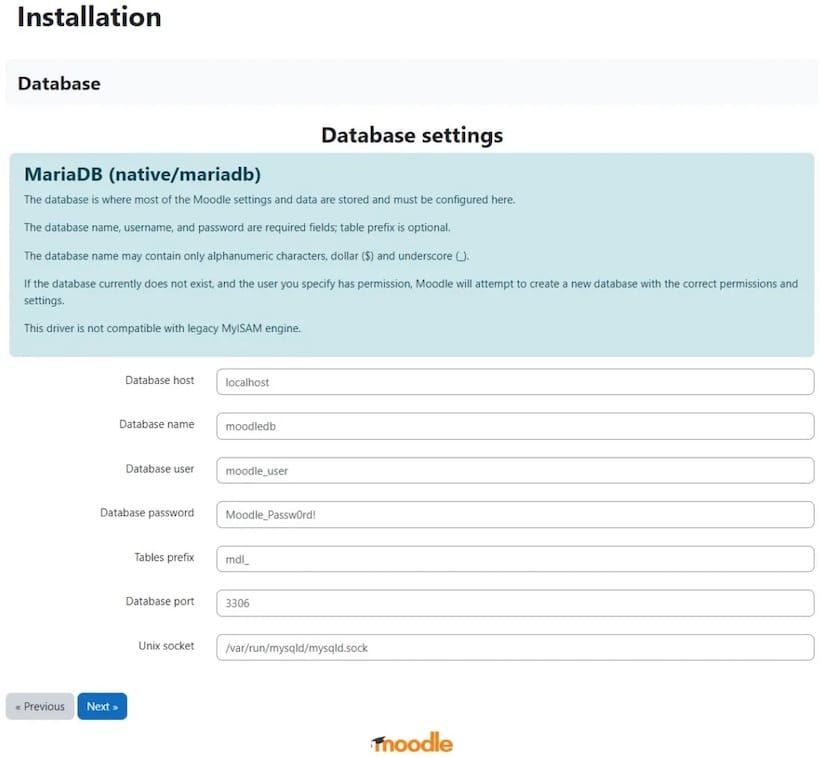
次に、MariaDBコンソールにログインし、Moodleのデータベースを作成する必要があります。 次のコマンドを実行します。
mysql -u root -p
これによりパスワードの入力を求められるので、MariaDBのrootパスワードを入力し、Enterキーを押します。 データベースサーバーにログインしたら、Moodleをインストールするためのデータベースを作成する必要があります。
MariaDB [(none)]> CREATE DATABASE moodle_db;
MariaDB [(none)]> CREATE USER 'moodle_user'@'localhost' IDENTIFIED BY 'your-strong-password';
MariaDB [(none)]> GRANT ALL ON moodle_db.* TO 'moodle_user'@'localhost';
MariaDB [(none)]> FLUSH PRIVILEGES;
MariaDB [(none)]> EXIT;
ステップ6.Moodle用のNginx仮想ホストの設定。
次に、Nginx仮想ホスト構成ファイルを作成します。
nano /etc/nginx/conf.d/wordpress.conf
次のファイルを追加します。
server {
    listen 80;
    root /var/www/html/moodle;
    index  index.php index.html index.htm;
    server_name  your-domian.com;

    client_max_body_size 500M;

    location / {
        try_files $uri $uri/ /index.php?$args;
    }

    location = /favicon.ico {
        log_not_found off;
        access_log off;
    }

    location ~* .(js|css|png|jpg|jpeg|gif|ico)$ {
        expires max;
        log_not_found off;
    }

    location = /robots.txt {
        allow all;
        log_not_found off;
        access_log off;
    }

    location ~ .php$ {
         include snippets/fastcgi-php.conf;
         fastcgi_pass unix:/var/run/php/php8.1-fpm.sock;
         fastcgi_param SCRIPT_FILENAME $document_root$fastcgi_script_name;
         include fastcgi_params;
    }
}
ファイルを保存して閉じ、Nginx Webサーバーを再起動して、変更を加えます。
nginx -t
sudo systemctl restart nginx
sudo systemctl restart php8.1-fpm
ステップ6.MoodleでセキュアHTTPSを有効にします。
まず、インストールします Certbot 次のコマンドを使用してUbuntu22.04で:
sudo snap install core
sudo snap refresh core
sudo snap install --classic certbot
sudo ln -s /snap/bin/certbot /usr/bin/certbot
Certbotのインストールが完了したら、次のコマンドを使用してNginx用にCertbotをセットアップします。
sudo apt install python3-certbot-nginx
次に、次のコマンドを実行して、証明書の作成を開始します。
sudo certbot --nginx --agree-tos --redirect --hsts --staple-ocsp --email admin@your-domain.com -d www.your-domain.com
出力:
-------------------------------------------------------------------------------
Congratulations! You have successfully enabled https://domain.com and https://www.your-domain.com

You should test your configuration at:
https://www.ssllabs.com/ssltest/analyze.html?d=your-domain.com
https://www.ssllabs.com/ssltest/analyze.html?d=www.your-domain.com
-------------------------------------------------------------------------------

IMPORTANT NOTES:
- Congratulations! Your certificate and chain have been saved at:
/etc/letsencrypt/live/your-domain.com/fullchain.pem
Your key file has been saved at:
/etc/letsencrypt/live/your-domain.comm/privkey.pem
Your cert will expire on 2022-07-20. To obtain a new or tweaked
version of this certificate in the future, simply run certbot again
with the "certonly" option. To non-interactively renew *all* of
your certificates, run "certbot renew"
- If you like Certbot, please consider supporting our work by:

Donating to ISRG / Let's Encrypt: https://letsencrypt.org/donate
Donating to EFF: https://eff.org/donate-le
Let’s Encryptの証明書の有効期間は90日です。証明書の有効期限が切れる前に、証明書を更新することを強くお勧めします。 この更新プロセスが正しく機能していることをテストするには、次のコマンドを実行します。
sudo certbot renew --dry-run
出力:
Saving debug log to /var/log/letsencrypt/letsencrypt.log

- - - - - - - - - - - - - - - - - - - - - - - - - - - - - - - - - - - - - - - -
Processing /etc/letsencrypt/renewal/your-domain.com.conf
- - - - - - - - - - - - - - - - - - - - - - - - - - - - - - - - - - - - - - - -
Account registered.
Simulating renewal of an existing certificate for your-domain.com and www.your-domain.com

- - - - - - - - - - - - - - - - - - - - - - - - - - - - - - - - - - - - - - - -
Congratulations, all simulated renewals succeeded:
  /etc/letsencrypt/live/domain.com/fullchain.pem (success)
- - - - - - - - - - - - - - - - - - - - - - - - - - - - - - - - - - - - - - - -
手順7.ファイアウォールを構成します。
Ubuntu22.04には ufw デフォルトで実行されているファイアウォール。 ポートを介した接続を有効にする 80 HTTPと 443 HTTPS:
sudo ufw allow 'Nginx FULL'
sudo ufw enable
sudo ufw status
ステップ8.MoodleWebインターフェースへのアクセス。
正常にインストールされたら、Webブラウザを開き、URLを使用してMoodleインストールウィザードにアクセスします https://your-domain.com。 次のページにリダイレクトされます。


おめでとう! これでMoodleが正常にインストールされました。 Ubuntu 22.04 LTSJammyJellyfishシステムにLEMPを使用してMoodleをインストールするためにこのチュートリアルを使用していただきありがとうございます。 追加のヘルプまたは有用な情報については、チェックすることをお勧めします Moodleの公式ウェブサイト。
VPSマネージドサービスオファー
The post Ubuntu22.04LTSにLEMPスタックを使用してMoodleをインストールする方法 appeared first on Gamingsym Japan.
