Very often when taking photos, especially when using smartphones for these purposes, camera app incorrectly determines the orientation of pictures. Those images that should be in landscape orientation are saved in portrait. If the system failed, then there can be quite a lot of such photos. For comfortable viewing, they must be turned over. Doing this for each image separately can be quite laborious.
It’s nice to know that a computer can perform all these actions using standard software.
ПОДПИШИСЬ НА НАШ ЯНДЕКС.ДЗЕН. ТАМ КАЖДЫЙ ДЕНЬ ВЫХОДЯТ ЭКСКЛЮЗИВНЫЕ СТАТЬИ, КОТОРЫЕ НЕ ВЫХОДЯТ БОЛЬШЕ НИГДЕ
Moreover, some of them may also have a large size, which will not allow them to be uploaded to various web services and sites. For example, you cannot attach a file larger than 2 MB to the State Services, and modern smartphones make photos much harder. Let’s figure it out as much as possible rotate images and compress some of them on Mac computers.
How to Rotate Images – macOS
Even rotating a dozen photos en masse will be much more convenient than doing it under one.
Unfortunately, the periodic need forback of a large number of images It doesn’t just happen to professional photographers. Even when shooting a child’s birthday with your smartphone, you can get photos with the wrong orientation. This happened in my case as well. On the smartphone Xiaomi Mi 10T Pro, there was some kind of failure in Camera app and several dozen shots have been preserved instead of horizontal orientation in vertical.
If you find yourself in a similar situation, and have a computer at hand or Apple laptopthen you can do rotate images in bulk. There are two options for these actions:
- By using Photos app.
- By using Finder.
Of course, if an iPhone was used for shooting and turned on sync photos with iCloud, then you do not have to download them separately to your computer. To rotate images in bulk via Photos app necessary:
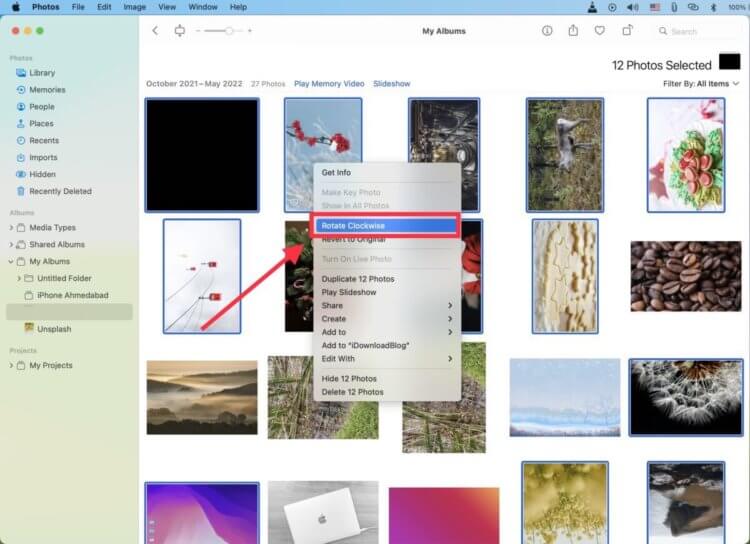
All actions can be rolled back, so do not worry about the result.
- Open the Photos app and go to your library or album of your choice.
- Hold down the “cmd” key and left-click on the images you want to rotate.
- After you have finished selecting, release the “cmd” button and right-click on any of the selected photos.
- Click the Rotate Clockwise button.
All selected photos will be rotated 90 degrees clockwise. You can repeat the process several times until the desired result is achieved. If at some point you realize that you overdid it, then cancel changes You can use the keyboard shortcut “cmd + Z”. You can return to the original orientation of the images by simply repeating the rotation four times. The most convenient thing about this method is that the position of the photos will change on all devices that are connected to your iCloud Photo Library.
ПОДПИШИСЬ НА ТЕЛЕГРАМ-КАНАЛ СУНДУК АЛИБАБЫ, ЧТОБЫ ПОКУПАТЬ ТОЛЬКО ЛУЧШИЕ ТОВАРЫ С АЛИЭКСПРЕСС
If the photos are just on a flash drive or in a folder, then you can rotate them there as well. This method has one minus – there will be no synchronization with other devices. But you may not even need it.
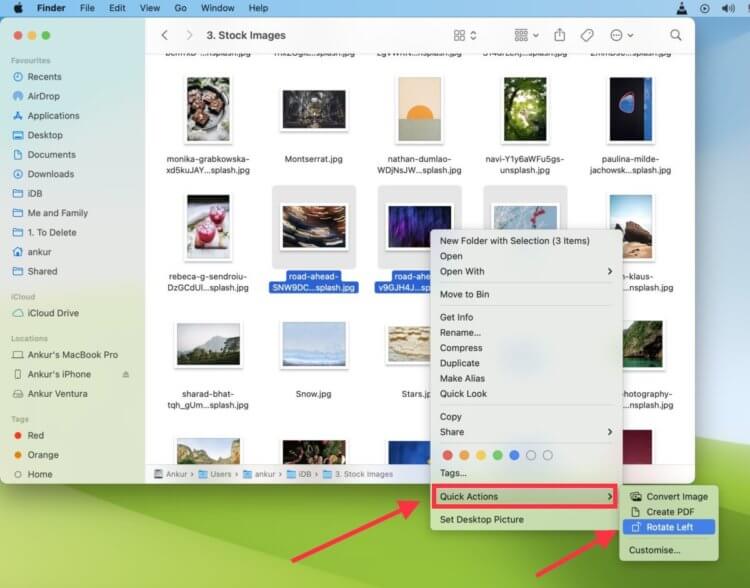
Flipping through the Finder is most convenient if you’re not tied to the Apple ecosystem.
- Open Finder and go to your images folder.
- Clamp “cmd” key and left-click on the images you want to rotate.
- After you have finished selecting, release the “cmd” button and right-click on any of the selected photos.
- Hover over Quick Actions and select Rotate Left from the menu that appears.
These actions will also allow you to quickly flip a large array of images.
How to compress an image on a Mac
Image compression is required more and more often lately.
But one revolution is not always enough. The weight of the photos may prevent them from being added to various sites or applications due to the limitations of the services themselves. To prevent this from happening, images need to be compressed. This can be done in several ways. The first is through quick actions in Finder:
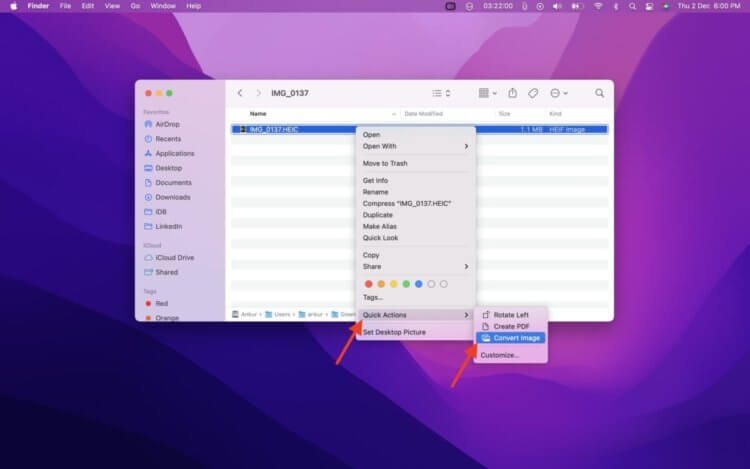
It’s good that it is possible to compress with built-in tools.
- Open Finder and navigate to the folder with the desired photo.
- Click on it with the right mouse button.
Hover over “Fast Actions” and select “Convert Image” from the menu that appears. - In the window that appears, you can select the format and size of the final file.
- After setting the necessary actions, click the “Convert to …” button.
After these steps image weight will be significantly reduced. Moreover, these actions are relevant not only for one photo, but several times. It is only necessary instead of one picture to select all that you want to convert.
 ПОДПИШИСЬ НА НАШ ТЕЛЕГРАМ-ЧАТ И ЗАДАВАЙ ВОПРОСЫ НАШИМ АВТОРАМ, НА КОТОРЫЕ ОНИ ОБЯЗАТЕЛЬНО ОТВЕТЯТ
If for some reason you do not want to use the Finder for these actions, then you can compress photos using Preview app.
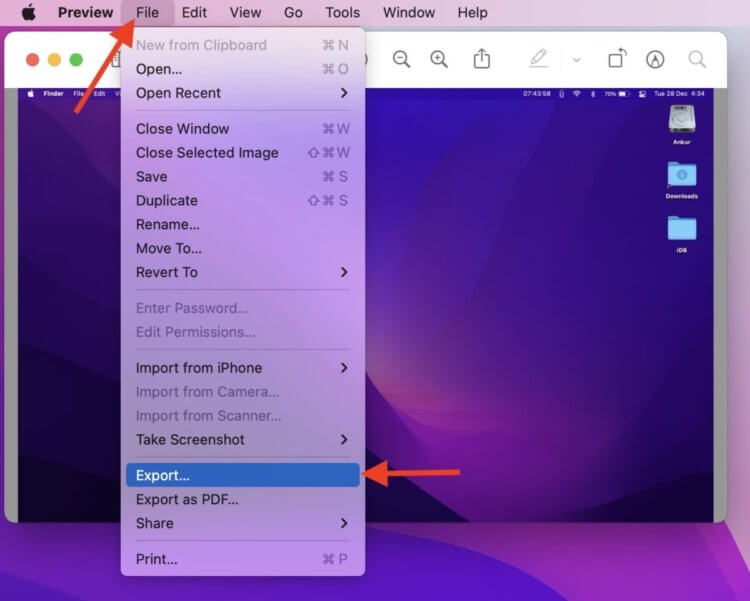
“Preview” allows you to quickly reduce the size of the image.
- Open the image in Preview.
- Click the “File” button and select “Export” from the list that appears.
- In the window that appears, set the final image quality and format.
- Click the “Save” button.
These actions can be performed on several photos at the same time before opening, simply by selecting them all instead of one. For compression, you can use Photos app:
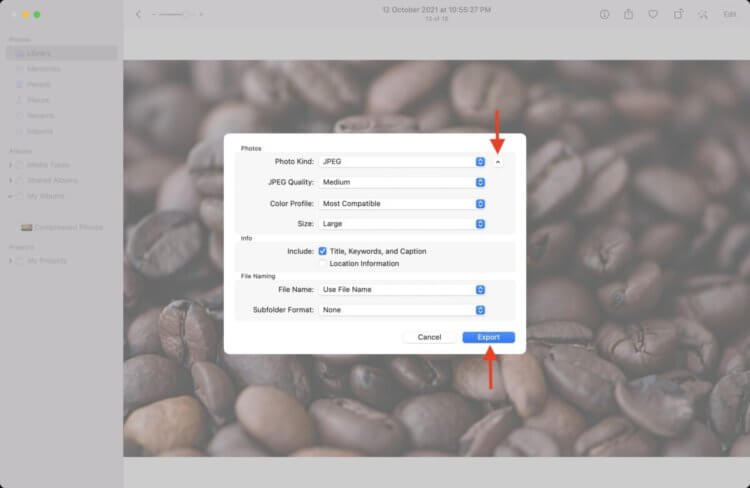
Try not to use the HEIC image format, as it may have problems opening.
- Open Photos.
- Select one or more photos.
- Click “File”, select “Export” from the menu that appears, and go to “Export Photo”.
- Adjust the format and quality of the resulting images and click the “Export” button.
If these actions seem somewhat complicated to you, then you can use special web services for these actions:
- Go to iloveimg.com.
- Click the “Select Images” button and select the required photo to compress.
- Wait for them to load on the site and click the “Compress IMAGES” button.
- Wait for the compression and download the final image by clicking the “Download compressed IMAGES” button.

For compression, I most often use this method.

Uploading images to the site is fast enough.

The image is reduced by at least 50%, which is sufficient in most cases.
The service works quite quickly and does not cause any difficulties with its use. The main thing is to have access to the Internet at hand.
The post How to Shrink and Rotate Multiple Images on a Mac appeared first on Gamingsym.
